Wednesday, November 24, 2021

Seascape - I'm Here For You

Seascape bundle front view


Seascape bundle detailed view


Today I am participating in the Crafty Challenge Blog Hop.  The Theme is a color challenge, to make any design but sticking to using the designated colors:


I hope you will check out all the links to see how each person interpreted the color challenge this month.  The list of live links are listed below.  

I chose to use the Stampin' Up! Seascape bundle from the Annual catalog.  

Through the use of a blending brush I applied Coastal Cabana to the center of the card front.  I then stamped off the bubbles, also using Coastal Cabana.

The coral is cut from Real Red cardstock and applied with multipurpose glue.

The Coastal Cabana Seahorse, I applied adhesive sheet to the back of the cardstock prior to running it through the Stampin' cut and emboss machine.  This turned it into a sticker once the backing was removed.

The Bermuda Bay Seahorse, I applied adhesive foam sheet to the back of the cardstock prior to die cutting it out.  This turned it into a more dimensional sticker.

The sentiment is stamped in Coastal Cabana.

All the product details are at the end of this posting.

Blog Hop Links


Thank you for visiting my blog today.  
Hugs,
Teah 


Product List

Tuesday, November 23, 2021

Merry Snowflakes Christmas Card


Merry Snowflakes front view

Merry Snowflakes - detailed view

Merry Snowflakes is a great stamp and die set for creating everything from simple to stepped up holiday cards.

Today, I demonstrated how to use the specialty embossing plate that creates the small snowflake cuts that you can see in the Balmy Blue cardstock.  Then I applied die cut snowflakes in two different heights.  By applying an adhesive strip to the back of the Basic White cardstock prior to placing dies and running it through the Stampin' Cut and Emboss machine, I've effectively created a snowflake sticker that can be applied to the card front.  I also selected a couple of snowflakes that I wanted to be a bit further off of the page..... so I used adhesive foam sheet behind the Basic White cardstock.  This created just the right amount of depth so that there was a bit of dimension on the card front.  

You can watch the YouTube video by clicking on this photo.


All the product details are listed below.

Thanks for visiting my blog today.
Hugs,
Teah


Product List

Sunday, November 21, 2021

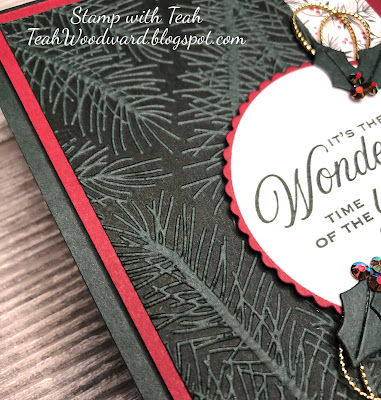
Tidings and Trimming Christmas card


Tidings and Trimming card front

Tidings and Trimmings dry emboss detail

Tidings and Trimmings Focal point detail

Tidings and Trimmings inner card

Hello!  It is a cold day here in the PNW.  Tea and a cozy blanket are involved in my blog writing today!

Last night I made this card and just couldn't wait to share it with you.  I really wanted to design a card around the fir branches in the Wintry 3D embossing folder.  I decided to use a technique that I demonstrated on World Card Making Day 2021........ Dry embossing.  The use of ink on an embossing folder to accentuate the details in the folder. I love how it turned out!

To create this distinctive texture, I applied the Evening Evergreen ink pad directly to the face side of the embossing folder.  When closed, the front of the folder has the Stampin' Up! logo on it, the inside of that flap is the face side of the embossed design.  This is where I applied the ink from the ink pad.  I then set up the Stampin' Cut and Emboss machine, inserted the Evening Evergreen cardstock being careful to not let the cardstock shift around.  After running the folder through the machine, again be careful when removing the cardstock, so as not to pick up an excessive ink from around the cardstock.  

Product details listed below.

Thank you for stopping by my blog today.
Hugs,
Teah 


Product List

Phrases & Frames with Nature's Symphony

  Phrases & Frames Bundle + Nature's Symphony Bundle This weeks Monochromatic Insta Hop color is all about Petal Pink!  To show off ...