 |
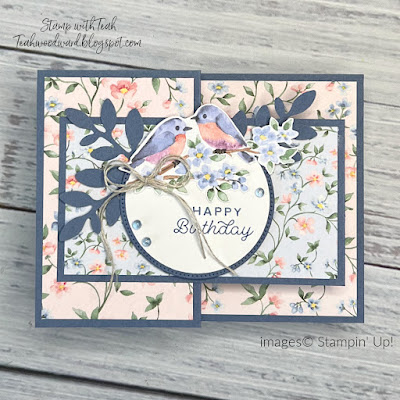
| Flight and Airy Fun Fold |
 |
| Flight and Airy Fun Fold |
 |
| Flight and Airy extended view |
 |
| Flight and Airy Front detail view |
 |
| Flight and Airy + Circle Sayings - Inner view |
 |
| Flight and Airy Back view |
This card is available as one of the 3 card kits that I will be sending out as a Thank You gift for a purchase of $25 or more in my online store during the month of January, 2024.
Cutting instructions:
- Card base: 11" x 4 1/4", scored at 2 3/4" and 5 1/2"
- Front Z-fold: 10" x 2 3/4", socred at 4 3/4" and 7 1/2"
- DSP for card base: 2 pcs 2. 1/2" x 4", 1 pc 5 1/4" x 4"
- DSP for front z-fold: 1 pc 4 1/2" x 2 1/2", 1 pc 2 1/2" x 2 1/2"
- Basic White cardstock for far right panel of z-fold : 2 1/4" x 2 1/2"
- Message liner on back of card: 4" x 5 1/4"
- DSP on message liner: 2 pcs 3/8" x 5 1/4"
- Punch 3 Boughs
- Punch 1 Basic White circle
- Circle matte layer: Die cut using Stylish Shapes Dies circle
- Fussy cut birds from DSP to use as focal point
- Linen Thread: 20"
Assembly instructions:
- Adhere 3 pcs of DSP to card base
- Adhere DSP to left and middle sections of z-fold
- Stamp and color image on 2 1/4" x 2 1/2" pc. Adhere to far right section of z-fold.
- Stamp sentiment on Basic White circle. Adhere to matte layer circle. Adhere fussy cut bird focal point on circle. Adhere 3 Boughs behind circle. Adhere to center of z-fold left panel using dimensionals. Add bow and scatter gems.
- Adhere DSP strips to message liner. Adhere message liner to back of card.
- Line up z-fold on top of card base. Apply adhesive to back of left side of z-fold so that it only adheres to left panel of card base.
- Place card on face, flip back of card base away. Apply adhesive to back of the right z-fold panel only. Carefully close the card so that the adhesive sticks to inner back card base.
Let me know if you have any questions. I would be glad to help!
Thank you for visiting my blog today!
Product List
Hugs,
Teah


No comments:
Post a Comment