 |
| True Love - Thank you card Friends, I have a true love for black and white prints. I find them to be flexible and so easy to coordinate either with more black and white, with pops of color, or metallics. So what a great gift to me, to find that Stampin' Up!® had this new designer series paper in the January - June Mini catalog!! 12 different prints (thats 2 each of 6 double sided papers)!! I am sharing this card as part of the Demonstrator Support Group Blog Hop. The link for each of the demonstrators participating in the blog hop are listed at the bottom of this post. We do hope you will support us by hopping from one blog to the next. You will find a great amount of talent and inspiration. For this card, I used the striped side as the background, and on the flip side of the same paper are these beautiful flower clusters. I fussy cut the cluster, then colored it with Stampin' Blends ® I love to decorate my envelopes, so I added a piece of the stripes to the back flap. Now I'm all set to start mailing these beauties out!! This is the card I am sending out to my customers that place orders in February. Materials: Real Red cardstock Basic Black cardstock Basic White cardstock True Love DSP Daffodil Delight Stampin' Blends® (dark) Real Red Stampin' Blends® (light and dark) Granny Apple Green Stampin' Blends® (light and dark) Champagne Rhinestones colored with Real Red Stampin' Blends® (dark) Multipurpose glue Dimensionals Heal Your Heart stamp set ( I fussy cut around the sentiment)  Blog Hop Links It looks like we might finally get a bit of winter weather here in the Pacific NW corner of the US. I'm prepared with herbal tea, snacks, warm socks, and a well stocked craft room. I love a good reason to focus on the craft that I love. Leave a comment to let me know what you won't get caught without, during a winter storm. Thank you for visiting! Stay safe and be well. Hugs, Teah Here is the Link to my online store |
Monday, February 8, 2021
True Love - Thank you card
Saturday, February 6, 2021
Flower and Field DSP birthday card
 |
| Flower and Field Birthday Card This card just makes me happy to look at it! Bumble Bee colored cardstock for the base is absolutely perfect with this Flower and Field DSP panel on the front. I matted the DSP with Poppy Red cardstock to make it "pop". The sentiment panel is a mix of stamp sets. I used the Happy Birthday from Vine Design stamp set, and the corner flowers are from Lots of Heart stamp set. I lifted that panel with a Stitched So Sweetly die cut Basic Black border matte. Then I raised it by adding one layer of dimensionals. The single heart is from the Lots of Heart stamp set. Tied with Whisper White ribbon and this card is ready to be given to someone special. By the way..... do you love that Flower and Field DSP?!?! Well it is FREE with a $50 purchase between now and February 28th. Thanks for visiting my page. My love to you all, Hugs, Teah |
Lots of Heart bundle treat box

 |
| Lots of Heart Treat Box I had so much fun designing this box as I went..... Every die and stamp makes me want to create more! In this case, I used the White and Black polka dot print paper from True Love DSP in the January-June Mini catalog, and just paired it with Basic Black cardstock for the base. This box measures 4" x 4" and is 2" tall. To simplify attaching the heart border around the box, I applied the Stampin' Up! Adhesive Sheets to the back of the Real Red cardstock. After running through the Stampin' Cut and Emboss machine, I just peeled away the backing and was able to easily adhere the border. I stepped the height of the hearts with dimensionals. The first heart was glued down to the box top, the 2nd heart was stepped up with one layer of dimensionals, and the 3rd heart was stepped up with the dimensionals stacked 2 layers. Topped off with a bow of Real Red, and voila'! Here is the link to the Stamps and Dies bundled together (10% savings when purchased as a bundle) Stay safe and be well, My love to you all, Teah |
Monday, January 11, 2021
Lots of Heart Thank You Card
 |
| Lots of Heart Thank You Card |
Here we are with Sale-a-bration in full swing! My January customer Thank You card features a stamp set from the new January-June mini catalog, and some of the designer series paper that is offered for free with a $50 purchase.
I want to spread joy to all the people in need of a bit of extra love right now, so I opted for a happy heart themed Thank you card.
Highlights to create this project
The stamp set used is Lots Of Heart bundle from the January - June mini catalog.
I used Tuxedo Black Momento ink for the stamping, as well as Light Rococo Rose, Dark Cherry Cobbler, and Light Granny Apple Green Stampin' Blends to color in the accents on the heart
Cardstock colors are Basic White, Basic Black, and Cherry Cobbler.
Envelope color is Basic White.
Ribbon embellishment is the Whisper White Polka Dot Tulle Ribbon

Thank you for joining us for our Stampin' Up!® Demonstrator Monthly Team Blog Hop! We are a group of Stampin' Up!® Demonstrators from around the world that are taking part in a training that is helping us to build a successful Stampin' Up! business, and reach goals that we have set. We are so happy that you could join us today for this blog hop for ideas and creative inspiration. We really appreciate your support.
BLOG HOP LINKS
Here is the link to my Online Store.
Thank you for visiting.
Stay safe and be well,
Hugs,
Teah
Monday, December 14, 2020
Peaceful Boughs - Thank You card
 |
| Peaceful Boughs - Thank You |
Every month I design a new Thank You card for my customers. It is such a happy task, because I simply have the best customers there are! They are incredibly creative and collaborative. Every one of them are kind and inspiring. So when it comes to designing a Thank You card, it is important to me to express, through my design, my sincere appreciation for them choosing me as their Stampin' Up!® Demonstrator. This month of December, I chose a classic wintery theme. Simple pinecones with gold embossing for the sentiment.
Highlights to create this project
The stamp set used is Peaceful Boughs from the Annual Catalog.
To create the embossed sentiment I used Versamark ink, and Gold Embossing Powder
Cardstock colors are Crumb cake, Early Esspresso, and not shown is Very Vanilla as the card insert.
Ink color is Early Espresso.
Envelope color is Very Vanilla.
Gold cord is from the Wonder of the Season Ribbon combo pack (retiring soon)
The sentiment is from the Heal Your Heart stamp set that will be available in January as a Sale-a-bration free product earn with $50 purchase. If you want it prior to the sale-a-bration promotion, join my Paper Blessings team to enjoy the perks of early access to all the new products!
Blog Hop Links
Here is the link to my Online Store.
Thank you for visiting.
Hugs,
Teah
Saturday, November 21, 2020

Click here to see the short list of exclusions.
I'm planning my final Holiday cards, crafts, and special touches, so I am super excited to save a bit on product I already needed anyway.
Let me know if you have any questions. I would be glad to help!!
In the meantime, I'll be over here in the corner making my list for this sale 💖
Hugs
Monday, November 9, 2020
Quite Curvy Bundle - November 2020 Blog Hop


Wow! Its November already!
Here, in the Pacific North West region of the US, we have had some cold yet glorious sunny days. As I take note of my blessings this month, I can't help but recognize that because of this pandemic I have had the opportunity to see all the beautiful fall colors on the trees. Since I am working from home, I actually get to see all the brilliant beauty that autumn brings. This has been a true blessing.
Another of my blessings are my great customers! I am blessed for every opportunity I have to share my love of paper and ink crafting with all of you. And I am doubly blessed, because I grow and learn from each and every one of you. Thank you for your trust and friendship.
I used the Quite Curvy Variety Bundle to create this "Thank You" card for my customers this month.
The shopping link can be found at the bottom of this post.
The highlights of this project:
- Misty Moonlight Card stock for the card base
- Whisper White card stock for card front and interior
- Sahara Sand DSP from Classic Christmas Designer Series Paper
- Misty Moonlight, Whisper White, and Seaside Spray card stock for die cut foliage, from the Curvy Die set
- Linen thread and the Misty Moonlight/Silver Bakers Twine from the Flowers for Every Season Ribbon Combo pack
- Misty Moonlight Ink on front and inner card
- Foliage on inner card is from Curvy Christmas
- Inner sentiment is from the Many Mates stamp set
- Clear Elegant Faceted Gems for just the right touch of "bling" to the card front
This card was quite quick to stamp, cut and assemble. Enjoy!
As mentioned at the top, this is a blog hop so please do make sure you "hop" around to all the amazing projects on this hop. Click the links below to visit them.
Blog Hop Links
Here is the link to this bundle in my online store:
Be safe and stay well.
Hugs,
Teah
Sunday, October 25, 2020
Prized Peony Bundle
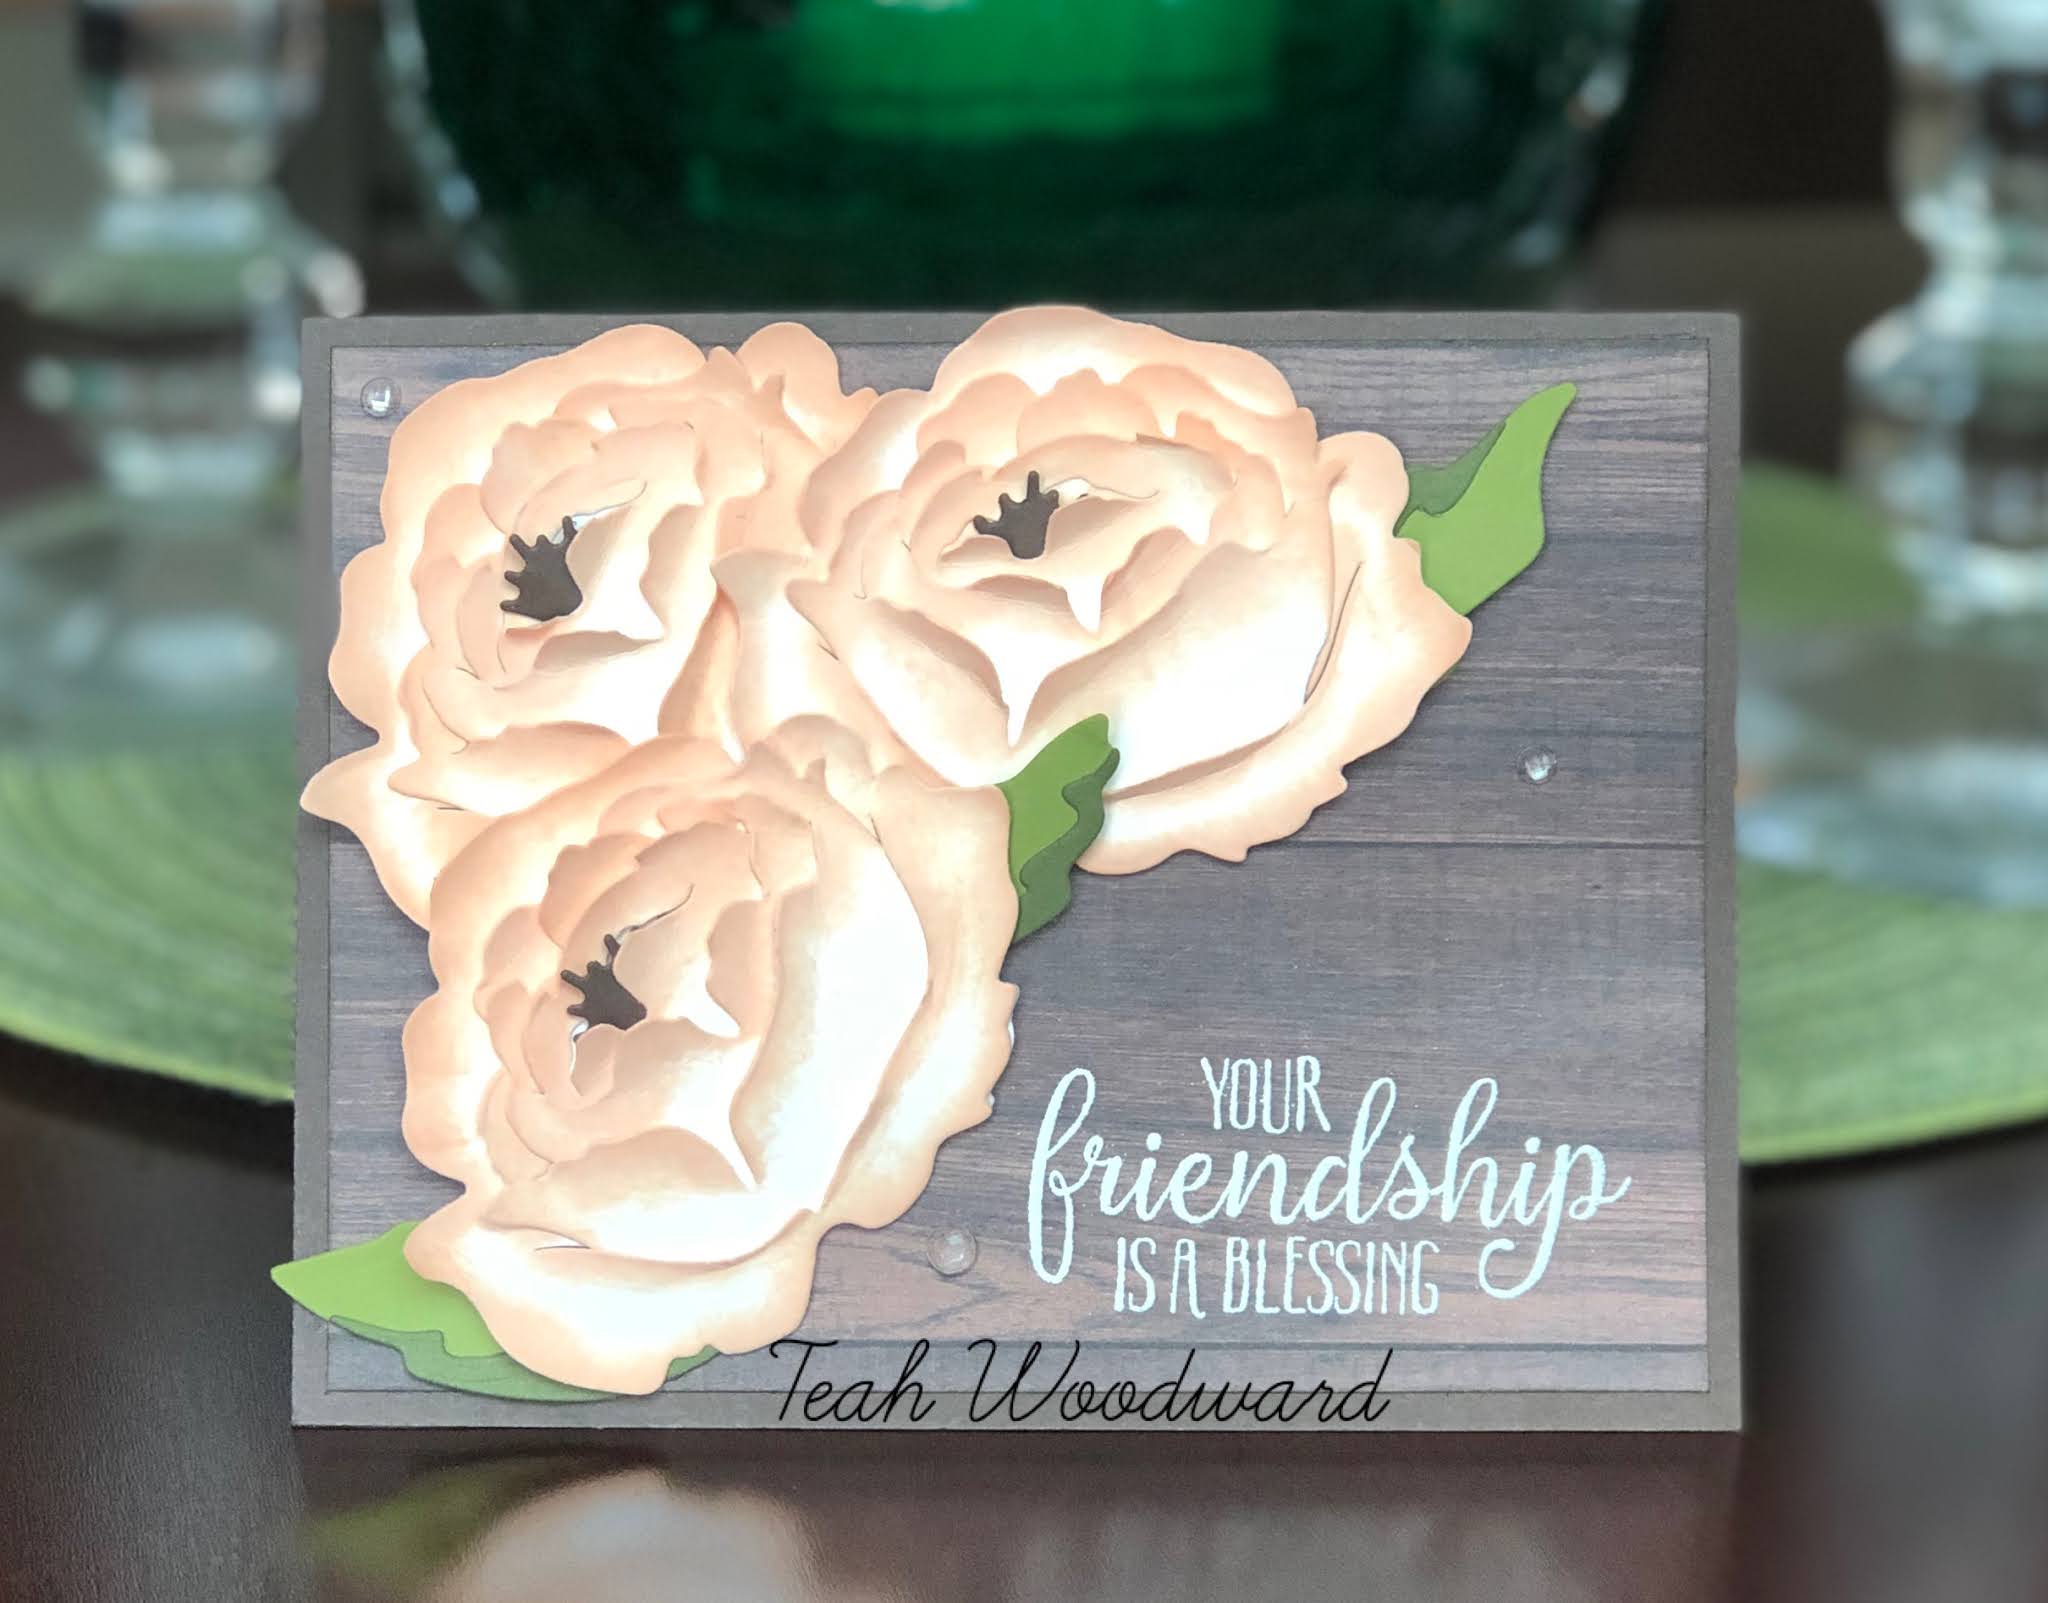
As a demonstrator, we get early previews of upcoming promotions and catalogs..... Its one of the perks.
Well when we got to preview the Annual Catalog that would come out in June, 2020...... I was drawn to the Prized Peony bundle like a magnet! I needed my hands on those beautiful blooms right away. I've made quite a few different cards using this bundle, and eventually you will see them all..... but for today I wanted you to see this card..... with 3D flowers.
One of the card swap groups that I belong to had a monthly theme of "anything from the new annual catalog" and this is what I came up with. I made 11 of this cards...... and yes, that means I made 33 of these peonies!!
Here is the list of supplies:
- card base is Early Espresso card stock
- The wood look layer is designer series paper from the In Good Taste pack.
- I die cut the peonies out of Whisper White cardstock, then sponged the edges with Petal Pink ink. The flower center is die cut from Early Espresso cardtock.
- The leaves are die cut from Mossy Meadow and Old Olive cardstocks, and adhered together.
- The sentiment is created from the So Sentimental stamp set and White heat embossing powder.
- The subtle bling is made possible by using clear Elegant Faceted Gems
Here is the link to the stamp and die bundle that I used to make this card:
This is one of those cards that generated a lot of conversations and allowed me to meet many new friends.
This card could be simplified by just using one blossom, or enhanced by using ribbons. It would be perfect for any event..... Birthday, Get Well, Wedding/Anniversary. The sky is the limit with a 3D flower, and it was super, super easy to do. Let me know if you have any questions.
Hugs,
Teah
Snow Wonder Bundle

Back in August, when the August-December 2020 Mini Catalog came out, I immediately fell in LOVE with this snowman! This was the first set in the mini catalog that I just HAD TO HAVE!
He is classic! A perfect snowman with that scarf and hat.
This was the first card that I created with this stamp and die bundle, and WOW..... did I get a big response! I made this card for a group swap, and as a result have met so many people that have wanted to talk about it.
Here is the list of supplies that I used to create this happy card:
- Card base is Garden green cardstock.
- Pop layer is Real Red cardstock
- The stamped image layer is Whisper White Thick cardstock - this is important in order to accomplish the debossed snowflakes.
- The trees are stamped in Garden Green ink using the stamps from this bundle. I then high lighted the snow on the trees and the base of the trees with Wink of Stella
- I stamped the snowman using Soft Suede ink, colored his hat and scarf using the Real Red and Light Mossy Meadow Stampin Blend pens, used Wink of Stella on the body to make him glisten, and die cut him using the dies from this bundle. He was applied to the card using Dimensionals for lift.
- The sentiment was created used White Heat Embossing Powder on Real Red cardstock. It was die cut using one of the label dies from this bundle, then applied with Dimensionals.
- Lastly, I debossed the snow flakes into the sky using the debossing dies that come in this bundle. I then took my time to carefully apply Wink of Stella to all the snowflakes for a sweet shimmer fromt he sky.
Here is the link to the bundle I used to make this card:
Today is a chilly day, and tonight we are supposed to get down into the 20's. But the skies are clear and there is no chance of snow..... so for now I will have to settle for making snowmen on cards for friends and family.
I hope this inspired you to create some holiday cards.
Thanks for joining me.
Hugs,
Teah
Celebration Tidings Bundle

At the beginning of October, I participated in a card swap and them theme was "gratitude". I really love the card swaps because I am exposed to so many techniques and combinations that I may not have thought of myself.
This is what I came up with simple card using the Celebration Tidings Bundle.
List of supplies:
- Card Base is Very Vanilla Cardstock with a layer of Pumpkin Pie
- I textured the Early Espresso cardstock using the Tasteful Textile 3D embossing folder
- Sentiment was created using the dies and stamps from the Celebration Tidings bundle, Early Espresso Ink, blender pens in Pumpkin pie - Old Olive - Cedar Cider
- Embellishments are the Cedar Cider In Color ribbon and Elegant Faceted Gems that I colored using my Pumpkin Pie Blender pens
- I used Dimensionals to lift the sentiment off the page
Here is the link to the Celebration Tidings Bundle:
What will you do this month to stretch you creative self?
I am grateful for every one of you that take the time to visit my blog.
I am also grateful for my faithful customers. I grow in beautiful ways because of all of you. Thank you 💕
Hugs,
Teah
Gather Together Bundle

Autumn is the perfect time for reflection. And while reflecting on events, feelings, and family, I am careful to give Thanks for all of my blessings. This card reflects the transition of trees as the leaves turn brilliant colors blanket the ground.
I used the following supplies to create this card:
- Woodland embossing folder with Crumbcake cardstock, layered on Early Espresso layer, and Cajun Craze card base.
- The leaves are die cut from Cedar Cider and Cajun Craze cardstock, Gold and Copper foil
- Sentiment is Early Espresso cardstock using the Stitched Nested Label Dies, and gold heat embossed sentiment from Gather Together Stamp set
- Accessorized with Gilded Gems and the copper ribbon from the Basket Weave and Metallic Ribbon Combo Pack
Here is the link to this beautiful stamp and die bundle:
Wishing you all a beautiful autumn season!
Hugs
Subscribe to:
Posts (Atom)
Phrases & Frames with Nature's Symphony
Phrases & Frames Bundle + Nature's Symphony Bundle This weeks Monochromatic Insta Hop color is all about Petal Pink! To show off ...

-
 Art Gallery Thank You Card Both my husband and I love flowers. John will buy 3-4 bundles of flowers and bring them home for me to arrange i...
 -
 Prairie Grass + Peaceful Pier My Prairie Grass stamp set just arrived yesterday, and I couldn't wait to use it! I was just as excited...