Thursday, May 9, 2024

Attention Shoppers - Happy Birthday

Attention Shoppers


Attention Shopper - detail view

Today's Stampin' Dreams Blog Hop theme is "In Colors".  So I chose the lovely new 2024-2026 In Colors!
Below you will find a list of blogs to explore to see how everyone else decided to fulfill the In colors theme.

I chose the new Attention shoppers bundle to design my card.  So festive and whimsical!  You will find the list of products at the end of the post.

Cutting instructions:
  • Card Base: 5 1/2" x 8 1/2", scored at 4 1/4".  This is a top fold card.
  • Front matte layer: 2nd largest Perennial Postage die
  • Card front layer: 2 7/8" x 4 1/8"
  • Bottles: scrap to stamp and die cut 2 
  • Flowers: scrap to stamp and die cut 1
  • Leaves: scrap to stamp and die cut 3 plants (the pots will be trimmed off)
  • Ribbon: 16"
  • Inner matte layer: 4 3/4" x 3 1/2"
  • Message liner: 2nd larges Perennial Postage die
Assembly instructions:
  • Burnish fold line using bone folder.
  • Using Light Summer Splash Stampin' Blends cap, flick tip of pen to spatter ink on front of card base and card front.
  • Using Tuxedo Black ink, stamp sentiment on lower right card front.
  • Adhere cardbase to front matte layer.  Wrap ribbon around center, attaching ends using tape on back.  
  • Color leaves using Shy Shammrock Stampin' Blends.  Die cut.  Trim off plant pot.
  • Color flowers using Petunia Pop, Pretty in Pink and Summer Splash Stampin' Blends.  Die cut.
  • Color bottles using Shy Shammrock and Peach Pie.  Die cut.
  • Arrange and adhere die cuts.  I used dimensionals on the flowers.
  • Tie bow on ribbon.
  • Adhere matted card front to front of card base using dimensionals.
  • Scatter gems.
  • Using Light Summer Splash Stampin' Blends cap, flick tip of pen to spatter ink on inner message liner.
  • Using Tuxedo Black ink, stamp sentiment on inner message liner.
  • Adhere message liner to inner matte layer.  Adhere to inner card base.
Let's take a look at those other blog posts using In Colors!

Thank you for visiting my blog today!
Hugs,
Teah

Product List

Tuesday, May 7, 2024

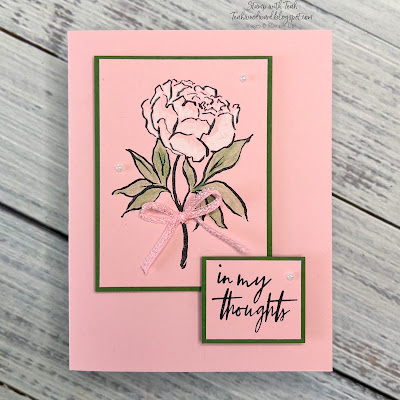
Poised Peony - White wash


Poised Peony


Poised Peony - detail view

Poised Peony -inner view

Today I had some fun creating a card using a whitewash technique for the Crafty Collaborations Technique Tuesday Blog Hop.  I had never used this specific technique before, so once again I stretched myself to learn something new.  I rather enjoyed learning to do this and look forward to using it again on other colors.  Be sure to visit the blogs listed below, to see everyone's White Wash projects!  Maybe you will learn something new too!

Cutting instructions:
  • Card base- Pretty in Pink: 5 1/2" x 8 1/2", scored at 4 1/4".  This is a side fold card.
  • Large front matte layer - Garden Green: 2 3/4" x 3 3/4"
  • Card front layer- Pretty in Pink: 2 5/8" x 3 5/8"
  • Sentiment matte layer - Garden Green: 1 3/8' x 1 5/8"
  • Sentiment layer - Pretty in Pink: 1 1/4" x 1 1/2"
  • Inner matte layer- Garden Green: 3 7/8" x 5 1/8"
  • Inner message liner- Basic White: 3 3/4" x 5"
  • Ribbon: 10"
Assembly instructions:
  • Using Stazon ink, stamp image on card front.
  • Using Blender Pen, apply Whisper White craft ink to flower petals leaving tips of petals pink.  
  • Using Garden Green Water Color pencil, color leaves.  Using Blender Pen, smooth in the colored pencil to fill the leaves.  
  • Adhere card front to front matte layer.  Adhere to front of card base using dimensionals.
  • Using Stazon ink, stamp sentiment on sentiment label.  Adhere to sentiment matte layer.  Adhere to card front using dimensionals.
  • Adhere bow to  stem of flower using a mini glue dot.
  • Scatter pearls to card front.
  • Using Stazon ink, stamp flower buds in corners of message liner.  Using Pretty in Pink Stampin' Blends add pink to the tips of the flower petals.  Use Garden Green Water color pencil and Blender Pen to color leaves.  
  • Adhere message liner to inner matte layer.  Adhere to inner card base.
Now let's see everyone else's projects!!

Thank you for visiting my blog today!
Hugs,
Teah


Product List

Thursday, April 25, 2024

Country Flowers - Ink & Inspiration


Country Flowers


Country Flowers detail view

Country Flowers Inner view

Today I am participating in the Ink & Inspiration Blog Hop.  In this blog hop I had the opportunity to either draw inspiration from the colors, the picture, or both.  I chose to draw my inspiration from the colors.  I used all the colors except Starry Sky.  Since Starry Sky is retiring in just a week, I chose to substitute in Night of Navy in its place.  

Be sure to visit all the blogs listed below to see how everyone decided to use the inspiration photo and colors!  It is so much fun to see everyones beautiful creations!.


The Country Flower Bundle and the Eyelet 3D embossing folder will both be available starting May 1st.  Petunia Pop and Shy Shamrock are 2 of the new In-colors, also available starting May 1st. All other product links can be found at the end of this post.

Cutting instructions:
  • Card base - Basic White: 5 1/2" x 8 1/2", scored at 4 1/4".  This is a side fold card.
  • Front matte layer - Night of Navy: 4" x 5 1/4"
  • Card Front - Basic White: 3 7/8" x 5 1/8" - This layer is embossed with the Eyelet 3D embossing folder.
  • Circle background for focal point - Basic White: 7th largest Deckled Edged Circle Die
  • Flower Buckets - Basic White: scrap to stamp and die cut 3
  • Flowers - Basic White: scrap to stamp and die cut 3
  • Inner matte layer - Night of Navy: 4" by 5 1/4"
  • Inner message liner- Basic White: 3 7/8" x 5 1/8"
  • Linen Thread: 16"
Assembly instructions:
  • Using bone folder, burnish fold line.
  • Adhere embossed card front to front matte layer.
  • Adhere deckled circle to card front using dimensionals.
  • Using Tuxedo Black ink, stamp and die cut 3 Flower Buckets.  Color in using Night of Navy Stampin' Blends.  Stamp "Flower Market" using Night of Navy ink.  
  • Using Tuxedo Black ink, stamp and die cut 3 flower clusters.  Color one using Petunia Pop and Shy Shamrock Stampin' Blends.  Color one using Daffodil Delight and Pretty Peacock Stampin' Blends.  Color the 3rd one using Berry Burst and Pretty Peacock Stampin' Blends.
  • Assemble flower bucket on Deckled Circle at different heights using glue, and dimensionals.  Adhere flowers to match the depth of the buckets. 
  • Adhere linen thread bow using mini glue dot
  • Using Night of Navy ink, stamp image and sentiment to inner message liner.  Adhere to inner matte layer.
Let's visit those blogs together!

Thank you for visiting my blog today!
Hugs,
Teah

Product List

Attention Shoppers - Happy Birthday

Attention Shoppers Attention Shopper - detail view Today's Stampin' Dreams Blog Hop theme is "In Colors".  So I chose the ...